Friday, December 3, 2010

A Dino-mite Birthday Card?

Inspired by some Member Gallery photos on Two Peas In a Bucket, this dinosaur birthday card was 4 evenings in the making.

It's not my best work, not even good work. To be honest, I don't like it at all. Maybe it was the choice of colors but it looks like a kindergarten project. But, it did take me a while and is probably the most involved card I've made to date.

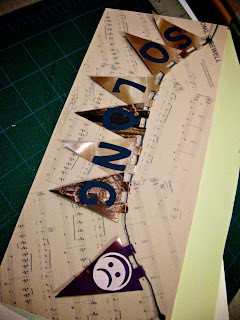
The paper used for the trees were printed with an argyle pattern. Then each dinosaur and tree was cut using the Silhouette SD then colored using Distress Ink - Antique Linen. A little bit of gold pigment ink was added to the dinosaurs and then finally I used a happy birthday stamp to randomly stamp the dinosaurs using distress ink again. The banner was made using Illustrator based on instructions found on the web and were touched up with distress ink as well. I got the depth perception I was looking for but SOMETHING is missing. What is it???

On the bright side, I got to finally use my stamp from China. Looks neats!


Thursday, December 2, 2010

Google Search: How to make a banner in illustrator

It's been a while, but I'm back at it again - card making. Good thing everyone has a birthday!

Bad thing is I'm tired of googling images that only meet 75% of what I envision and cleaning them up for use. Gimp used to be my best friend for the clean up task but now that Illustrator is in my life, I feel the need to create. So, today, after I created some of the raw pieces of the dinosaur birthday card, I realized the card needed a little umph. Perhaps a 'Happy Birthday' banner will do the trick. The creator in me googled 'how to make a banner in illustrator'.

Bless Google for returning this blog as the first search result and bless the soul of The Design Playbook for such detailed yet easy to follow instructions.

Now, my creation will be complete! While I work on the banner, the cutouts are laid out to dry.


Tuesday, November 30, 2010

Repurposed Supplies to Christmas Gift Tags

I think it's a fair trade off. I spend a little money on my very cool Silhouette SD and I skimp on some of the silly things I can now make like gift tags and wrapping paper.

The string: Originally purchased for my DIY Greek Goddess Halloween costume, is now used to hang the gift tags.

The cardstock paper: Just look at my previous blogs. But finally, an occasion where I can go crazy with red without feeling guilty.

The stamping: A cute little set of typeface rubber stamps I happened to find in my brothers room. After a little nagging, he gave up and let me have the brand new, still wrapped, set.

The gift tag shapes: I'm finally using the $10 gift card that came with my purchase of the Silhouette SD. I figured it was time especially with the Thanksgiving Sale of 50cents per shape.

Now, if I can only get creative enough with my wrapping.


Friday, November 19, 2010

Farewell Card: So Long, Farewell

Auf Weidersehen, goodbye. Yet another co-worker departs. This time it's the Mexican Bagpiper.


Resources:

Sunday, October 24, 2010

Anniversary & Birthday Cards: Paint the Town Red

This is what happens when all I have is a small collection of card stock colors and Anniversaries and Birthdays coming up.

First up is the Birthday Card. Totally loving the Silhouette numbers.


And here we have the Anniversary cards. Again, loving the laser cut images courtesy of my new Silhouette. You can see some of the flaws due to my impatient. Pulling vs. patiently x-acto kniving.

Friday, October 22, 2010

Monday, October 18, 2010

Silhouette SD Imports: How to create custom die cuts

Thank goodness for helpful blogs like Rhonna's. I see I'm not the only one that's madly in love with my Mac and Silhouette SD.
I first read about the Silhouette machine on Twig & Thistle and after about a week of holding out, I placed my order. It's been about two weeks since I've gotten it but up until today, I've only used the Silhouette Studio. I guess it must have been perfect timing based on reading all the reviews because the compatibility with Mac is something recent.
What Silhouette Studio is still missing though is the auto trace tool. Being in the technology field, I know THERE HAS TO BE ANOTHER WAY! So the fabulous world wide web told me that using Adobe Illustrator and a nifty plugin called Cutting Master 2 Robo v1.80, I too can create my Silhouette cutouts!

Pre-requisites:
1. Install the Silhouette machine
2. Install Adobe Illustrator
3. Install the Cutting Master 2 Robo Plug-in

Steps:
1. Follow all steps up to Step 4a on Rhonna's blog
2. Drag and drop your jpg or png file to Illustrator
3. Use the Selection Tool to resize the image (TIP: Hold SHIFT when dragging from corners to keep aspect ratio)
4. Select the image
5. Go to 'Object -> Live Trace -> Make and Expand
6. After paths are automatically created, right click on one of the plot paths and select 'Ungroup'
7. Use the Direct Selection Tool to select paths created around the border of the image
8. Follow step 4c on Rhonna's blog

Here's a Halloween inspiration idea from Tim Holtz!


References:
Cutting Master 2 Robo v1.80 (Plug - in for Adobe Illustrator)

My configurations:
Mac OS X 10.5.8
Adobe Illustrator CS5
Cutting Master 2 Robo v1.80
**if you have Adobe Illustrator CS4, download Cutting Master 2 Robo v1.61 directly from Silhouette America's website

Wednesday, October 13, 2010

Welcome Home

My aunt and uncle are movin on up...

So in celebration of their new home away from home, I put my new Silhouette to work. In are a bunch of rectangles, out comes a mini condo building.

It's an 8.5" x 11" brochure paper which I printed, cut, and folded into a tri-fold. Then velum paper was glued between the first two folds. It was tough getting the paper to crease at the right places because the windows were so close to the edge. To avoid ripping the cut out window panes, I place a hard cover book over one side, then slowly folded over the free side. It's on boring white paper, but, I guess I can live with white chic for now.


Friday, October 8, 2010

Fun with Fonts Friday: Birthday & Anniversary cards

Hurray! My printers back in commission thanks to my sis who bought a new black ink cartridge. It was too easy of a solution but, I'll take it!
Pop-up Spongebob is 1/2 way done but I had to quickly whipped up a birthday card and an anniversary card for calendar events that are quickly approaching. The result - more fun with lots of fonts!


Wednesday, October 6, 2010

It's Not Alive!: Printer go bye bye

I am so bummed. This is probably what I deserve for being too lazy and not caring enough about my leaky ceiling from the freak storm last week.
Last night when I tried to print my DIY Spongbob pop-up card for D's nephew, my printer, which happened to get dripped on, gave me a weird error. What do you mean "Remove and check cartridge on right"???
Please printer Gods, bring my HP photo printer back to life! My crafts depend on you! Should I try to make a Grilled Jesus and pray like Fynn did on Glee last night?

Anyway, before I discovered my comatosed printer, I was creating a Spongbob pop-up card template using one of the papercrafts as a baseline. Spongebob obviously also had to have a message to deliver so Google led me to some cool sites that have Free Speech Bubble Brushes for GIMP, Spongebob fonts and Disney fonts. I had to brush up on how to install brushes into GIMP but in the end, i'm happy with the results. Now, if only I could print the damn thing! No printed project, no pictures. :-(


Monday, September 27, 2010

Birthday Card Alternative: Papercrafts!

A birthday card can only impress a seven year old so much. So, I consulted with my oracle Google and stumbled on fabulous birthday 'card' alternatives for the highly imaginative mind of a 7 year old.

I printed this guy two weeks ago but I've been too intimidated to go hand-to-exacto-knife ... until now! Not too shabby! Now I have to figure out how to get it into an envelope.


Wednesday, September 22, 2010

Wedding Cards: Four Weddings Part II

I really should have been sleeping last night. But look at all the pretty fonts, flock, distress ink and paper!!


Fonts: Hurricane, Sunshine in My Soul, KR Heartalicious, Flower Ornaments

Saturday, September 18, 2010

Friday, September 17, 2010

Birthday Boarding Card: All Aboard!

Why iDIY stopped posting is beyond me. iDIY, I patiently wait for your return. In the mean time, I shall rummaged through older postings.

And rummage I did. I was looking for DIY birthday card ideas and almost always, my search in Google Reader takes me to iDIY. The boarding pass template looked the most promising but two late nights after work, and three boarding pass birthday cards later, I convinced myself it wasn't blog worthy. That was about a month ago.

I still don't think it's blog worthy but what the heck - my craftings / digital imagings have been few. Here's the result:


References:
Paper: Print Icon

Thursday, September 16, 2010

Sewing Printed Pattern Envelopes Reproduced and Repurposed

Once upon a time, there were Printed Patterns (apparently they still exist today but up until a minute ago, before I consulted with Google, I thought it was a thing of the past). I still remember wandering the fabric store isles with my mom rummaging through McCall's Printed Patterns. Half the time the patterns she liked were open and incomplete or weren't her size. Nevertheless, the memory of the patterns is forever engrained in my mind.
So, for my mom's birthday, when it came time to looking for images to use on a DIY birthday card and envelope, I eventually settled on a sewing pattern, a picture of a sewing machine and finally, a McCall's Printed Pattern Envelope.
Who'd have known that McCall Sewing Pattern Envelope images would be so readily available in high resolution? I'm tempted to make a ton of printed envelopes using reproductions of McCall's Pattern Envelopes just to stock up!


Oh the possibilities!

Friday, August 27, 2010

Thank You Cards: Stamped, Glued and Yet to be Delivered

Where does the time go? It's been 2 weeks since the big party and I'm still a bit upset at myself for not taking a single picture except for one shot with the birthday boy as he was cutting his cake. But, at least we have reminders of the special day (the 'seeds of wisdom' or more like 'seeds of sarcastic jokes' jar, the koozies, the sunflower seed favors, everyone else's pictures of the bag pipers, the boylan's rootbeer bottles, holes in the ground from the pitched tent, large mason jar centerpieces, and lots of play sand).
It is now up to D to send out the 30+ thank you cards that I made using leftovers from the invitations and a theme inspired by the 'seeds of wisdom'. Lets see how long it takes for his hands to hurt from the writing.


I was inspired by Twig & Thistle's surprise 30th birthday invitations envelopes. First of all, what a coincidence is it that the posting was for a surprise 30th Birthday? Secondly the timing couldn't have been closer. D's party was August 14th while the date on Twig & Thistle's invitation says July 10th. It must be meant to be (insert smile here).
In any case, I loved the idea so, I used Gimp and Pages to bring the project to life. I also got a little help from the following resources:

Monday, August 23, 2010

Centerpiece: Pin the tail on the candle

A week ago, we rushed my boyfriend out of the house in the early AM so that we could spend the next 6 hours preparing the backyard for his surprise birthday party. After all said and done, I have no photographs of the event itself. Just keepsakes like the candle that topped the large mason jar centerpiece.


This idea spawned from a portion of a sunflower seed label found on Style Me Pretty. We create our own label with the birthday boys name flanking the left of the big '30' and his birthdate (which has been redacted) flanking the right. Five labels were printed on a brown paper bag about 5 inches wide (printed label is 2.5" wide) and 5 inches high. Each label was cut into a strip. Then, each 2.8"x3" candle was wrapped evenly with two strips. Finally, to hold the labels down, instead of using glue or tape, we drove two thin sewing pins through the opposite ends of the labels and into the candles. (use a scissor or hammer to drive the pin in if your fingers begin to hurt). The pins were ingenious!

Friday, August 20, 2010

Retirement Gift Part III: Apothecary Jar and Friends

After a little show-and-tell of the Bananas spice jar, the rest of the gang decided to join in and express themselves using spice jars too.

We included:
- Potty Mouth Soap with a hotel size bar of soap shaved down to fit.
- Salmon Fish Oil Gluten with Swedish fish candies.
- I Spy Hinjew with a mix of milk chocolate & white chocolate covered almonds and a brown jelly bean. (not photographed).


This was our way of saying "goodbye and remember all the good times". Obviously to the outside reader, these sound absolutely ridiculous but then again, that's why it's called an inside joke.
It's amazing what you can do with a printer, label template, the right fonts and scraps of brown paper bags. We'll miss you Dennis.

Wednesday, August 11, 2010

A hint of vintage: 30th Birthday Surprise

It all started 4 weeks ago. First the invitations. Then the envelope labels. Following that were the favors. And what's a milestone birthday without a keepsake for the birthday boy? With all this, the gift wrapping for the presents have to be spectacular! Finally, to pull it all together, we consulted with owners of vintage goods to see they'd loan some to us as supplemental display items for the night.
The festivities are this weekend but here's a sneak peak which, I've been dying to reveal. It is, after all, the reason I got into this full throttle arts & crafts kick.


Tuesday, August 10, 2010

Retirement Gift Part II: Project Manager of the United States of America


I've been inspired. It started a few weeks ago when google landed me on 'iDo'-it-yourself. DIY ideas have been spinning in my head since but, none have left a greater impression than Motif: Silhouettes. So many possibilities!
Here's my first complete rendition of silhouettes. Yet another gift for a retiring colleague. Yes, he will be missed.

Printed on vellum paper (can be purchased from Staples). The smudge spot is his redacted signature. Background paper is white which colleagues will write their farewell message around the silhouette. The idea is not to have the messages overpower the print - thus the vellum. Lets see how it works out tomorrow at the office!

P.S. Creating the silhouette is easy as cake! I've read other blogs that used the approach of tracing paper over a printed photo but if you're a digital gal/guy, all you need is a digital camera or camera phone, computer and image editing tool.
  1. Take a digital profile picture of your subject. In our case, we recruited one of the jokesters of the office to pretend he was doing a camera phone photoshoot of the project team. What a great candidate because even after 5 snaps, the jokesters activities went completely unnoticed. Tip: try to have as blank of a background as possible. This will help during the editing process.
  2. Using a picture / graphics editing tool (I used Gimp on my mac), do your very best to capture the outline of your subject. I did this with a little tinkering of decreasing brightness, increasing contrast, desaturating, erasing noisy backgrounds, etc.
  3. Fill the outline with black if you haven't already.
  4. Erase the background if you haven't already.
  5. Have another go at decreasing brightness and increasing contrast until your silhouette is completely black.

Tada! A silhouette!

Thursday, August 5, 2010

Retirement Gift: It's Bananas!


B-A-N-A-N-A-S!
It's apothecary label from Eat. Drink.Chic. meets glass spice bottle from The Container Store to become a gag gift containing M&M's and banana runts from Dylan's Candy Bar. (Inside joke)

Tip from an Interior Design student: Instead of using double sided tape, I used paper cement. For maximum tackiness brush a layer of paper cement on the bottle and a layer of paper cement on the back of the label. Let dry for 45 seconds or until both layers appear matte. Affix the label to the bottle ensuring full contact between both layers of paper cement. Rub off excess.
Label was printed on scraps of brown paper bags. (also an inside joke)

Saturday, July 24, 2010

Mac App: Gimp isn't so Gimpy

I love my Macbook & I love all the mac open source applications as well. It took a while to find a good open source graphics editing app but once I found Gimp, my arts never went limp [insert corny smile here].
I recently upgraded to v2.6 and I just started using plug-ins and custom brushes. There are so many plug-ins and custom brushes out there but very little information on how to install them. After doing a bit of googling, I puzzled some of the many solutions together and here you are folks, a comprehensive list of instructions to follow on how to install Gimp plug-ins and brushes to Gimp v2.6.

How to Install a Gimp Plug-in (v2.6) on a Mac (Leopard OS):
Pre-requisite knowledge: Basic navigation on a mac (opening files, right-click,
locate downloaded files), basic knowledge of Terminal, know what your terminal password is, how to locate and use Gimp Plug-ins


1. Download the plug-in (files with .py, .c, etc extensions)
2. Navigate to /Applications
3. RIGHT click & select "Show Package Contents"
4. Navigate to /Resources/lib/gimp/2.0/plug-ins
5. Move/Copy the plug-in file to the "plug-ins" folder
6. Open Terminal
7. Type "cd //"
8. Type "cd applications/gimp.app/contents/resources/lib/gimp/2.0/plug-ins"
9. Type "sudo chmod u+x [insert plugin name here].py"
10. Enter your password
11. Restart Gimp
12. Follow instructions from site or readme file where plug-in was downloaded to locate the plug-in on Gimp


How to Install an Adobe Photoshop brush into Gimp (v2.6) on a Mac (Leopard OS):
Pre-requisite knowledge: Basic navigation on a mac (opening files, right-click, locate downloaded files), how to locate and use Gimp Brushes

1. Download the Adobe Photoshop brush (files with .abr, etc extensions)
2. Navigate to /Applications
3. RIGHT click on GIMP & select "Show Package Contents"
4. Navigate to Contents/Resources/share/gimp/2.0/brushes
5. Move/Copy the brush file to the "brushes" folder
6. Restart Gimp

Happy Gimping!

Here are some of my Gimp creations for various occassions.